Wednesday, December 12, 2012

Lions. No Tigers. Definitely Bears.

The Holiday Season is fully upon us.  I am pleased to say that this year I managed to complete the goal I start out with every year; to craft my way through Christmas gifts.  Seriously.

No.  Seriously.  Stop laughing.  I'll show you!

I can share these with you, since I've already gifted all of them to the small children for which they were intended...

A teddy bear in Cinderella colors.

A teddy bear in earthy colors and prints.

A teddy bear in girly colors and prints.

A teddy bear in manly colors and prints.

A lion!
Ok, ok, it is a teddy bear with a ruffle around its head and a different tail.
... still... it is a lion.

The gifts that I've made for the adults in my life are also completed, and I'll load those pictures up as soon as they are all gifted.


Monday, December 10, 2012

A Wild Dryad Appears!

I was recently commissioned to create a dryad costume.  I was given a picture to work with in regards to basic design, but included was a specific request to have detachable foliage.  I had to ponder a great deal on this, and this is what I came up with...

Here are some views of the outfit (front and back) without the foliage.  The ribbons that you see tacked onto the bodice are the way that the foliage will be kept on.

And here is how the costume looks (front and back) with the foliage attached.  I managed to find ivy leaves in a pre-made vine.  The "stem" of the vine was formed with little loops for easy hanging, which became quite convenient for my cause.

A detail shot of how I tied down the foliage to the costume.


Friday, December 7, 2012

The Pomegranate Dress... a Dress in Three Movements

I have a thing for pomegranates.  Not only are they tasty, but they feature quite a bit in history, mythology, and symbology.  Overall, I'm a fan.  In fact, I am enough of a fan that I spent 56 hours embroidering pomegranates into a dress.  I finished that "movement" of the dress for a competition, and while it scored well there were definite problems with it.  So, for the second "movement" of the dress, I fixed the dress up a bit and was happier for it.  The third "movement" of the dress is still forthcoming, but here are the pictures for now.

I started out simply, with a very simple a-line dress.  I knew I was going to have to alter the sleeves from a previous encounter with this pattern, but I love the line and shape of this dress too much to care.

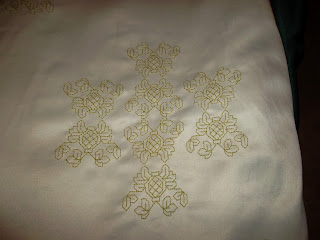
I took some time to work out what I wanted to do for an embroidery design.  This is a blackwork design that I simply love, but for more practical purposes I wanted to simplify it and enlarge it.

My first step was to find waste canvas I could buy by the yard (not the easiest thing) and cut out the pattern piece I wanted to have all of the embroidery.  In this dress, I wanted the front panel to have all of the fancy-bits.  Of note is that the width of my waste canvas was not helpful to my cause, so I had to cut the pattern piece into two pieces.  This became problematic later on.

I laid out my waste-canvas pattern onto the satin I was working with, pulled out a quilting frame, and put that quilting frame to work!

And then I embroidered... and embroidered... and embroidered.  By the end of the dress I had gotten a single pomegranate down to about an hour's worth of work... and there are 56 pomegranates throughout the dress.  You do the math.

These are some up-close pictures to what I began to call "the split".  It was more difficult than anticipated to match up the squares in the waste canvas and just continue embroidering, so I ended up adding a line or two of space between pomegranates.  I probably shouldn't admit this, as I'm pretty sure that no one has noticed on their own.

Once done with the embroidery (upper left), it came time to start pulling the waste canvas away (upper right).  Eventually, I was left with a nice, clean dress-front with some awesome handwork (center bottom)!

Next came construction, and with such a beautiful outside, I was loathe to have a messy inside.  So, I "french-seamed" the entire thing.

This dress was also when I got into the habit of encasing my sleeve-seams in bias tape.  I've improved the practice *greatly* since this dress.

There was also *no* way that anyone was seeing the back of my needlework.
So, I lined the front panel.


This was the first "movement" of the dress.  You can see from the pictures (if you look closely) that the hem is a travesty.  I rushed it and that is something that you cannot do with a circle hem.  I also wasn't terribly fond of the sleeves, but they served the purpose.


And here is the second "movement" of the dress.  I got a bit of a head start on my 2013 goal of "Fix It!  Finish It!" and went to town.  The sleeves came off and all million-miles of hem were pulled out.  I also took the stiff cording out of the neckline.

I replaced the cording with some thin elastic.  I am still not sure I'm pleased with the result.  It felt like I was pulling the dress' neckline back into place an awful lot.

What was once the sleeve to the dress became the "lower sleeve" and I added cap-sleeves to the dress itself.  I like the overall look better, but I might add some kind of gather agent where the upper sleeve and the lower sleeve meet.  They seem too bulky as they are now.

I redid the hem with bias tape.  I hate spending money on bias tape, but man-oh-man do I love the pre-packaged stuff.  I pay for convenience in situations such as this.

In the third "movement" of the dress, I plan to let out the center-back seam a little bit.  You can tell from the picture that my bust is rather restricted and I'd like to fix that.  This will require that I redo the neckline, but I will be able to reassess my recent choice in using the thin elastic.  I will probably also put some elastic into the join between the upper and lower sleeves, just to give that a test drive.

... of course, there is no telling when *that* will get done...
Ha!  Ha!  Ha!


Thursday, December 6, 2012

Sir Tomahomie's Kneeler

As aforementioned on this blog, I am a LARPer and in my LARP folks can get knighted for grand achievements over time.  It takes a severe amount of dedication, blood, sweat, and (more often than not) tears, so we have a tendency to make a big deal about it.  One of the "props" that is usually present at a knighting is a kneeler, and over time I have become the self-ordained maker of kneelers for my LARP kingdom.

My most recent kneeler was for Sir Tomahomie, and I actually managed to remember to take pictures of my process...

My fabric choices were not standard this time around.  I usually incorporate the heraldry of the knight-to-be, and Tomahomie's heraldry is really just a bit of Japanese Kanji.  So, I managed to find the same sari-brocade used to make Tomahomie's knighting raiment and chose a suedecloth to match it.

Funny story here; as I mentioned, Tomahomie's heraldry is just a bit of kanji, which isn't terribly interesting to embroider.  I'm not overly fond of/familiar with Asian inspired designs, so I was well and truly lost for inspiration on this kneeler.  I put out a Facebook call for help, and was immediately answered by a crafty-friend of mine who suggested that I look into Japanese "Mon".

Hours later, I had sifted through thousands of Mon, and I couldn't find a single one that represented "flame" in any way.  (Tomahomie's path to knighthood is that of flame.)  I suppose I understand, if your home is made primarily of wood and paper, you don't want to invite flame inside.  Frustrated, I turned away from the computer, just to see my son's copy of "Avatar: The Last Airbender" and it struck me that the Fire Nation symbol would be perfect.  Voila!

After piecing the computer-printed images together, I traced them onto tissue paper with a sharpie.

Then, I just hooped the tissue paper and cloth together with the intention of embroidering through the tissue paper and tearing it away afterwards.

Night one of embroidery... a chain stitch was used to outline the kanji and the flame.

Night two of embroidery... more chain stitching.

Night three of embroidery... I finished the chain stitching outline and tore away the tissue paper.

Night four of embroidery... I re-hooped the cloth so I could add in my fill stitches.  The kanji is filled with a split-backstitch in a brick-lain fashion and the flame is filled with what is called a "rice" stitch.

Night five of embroidery... the flame needed something in order to "pop" and my mother suggested that I highlight the curves of the flame in red.  I'm so glad she's so amazing.

The completed kneeler.  The kneeler is traditional "zabuton" size of 28" x 30", which turned out to be the perfect size for Tomahomie as he knelt in proper "seiza" position.  The heraldic emblem is sewn down in the center, but I gave it its own padding to give the flame some dimension.

Wednesday, December 5, 2012

You Remind Me of the Babe...

Everything fit my dear Nexus like a *dream*.

Here are the pictorial results...
Credits to Contessa Esselia for the photographs.

Side and back views of the ensemble.  The vest you see underneath was not part of my contribution, but totally *made* the outfit.

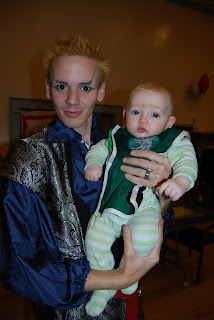
He liked the pictures of my progress so much that he dyed his hair and committed to the eye-makeup before even putting the ensemble on.  Flattered does not begin to describe my reaction.

Annnd... we happened to have a baby on hand.