Sunday, October 28, 2012

Witchy-ness

I churned out another Halloween costume.  This piece is for my friend, and was meant to be evocative of Elphaba from "Wicked".  It isn't any great innovation in terms of pattern or design (it is straight off a Simplicity Pattern), but there are some fun tweaks to it.  For example, the buttons are all mis-matched.


I managed to overcome my fear of gathering with this project, which is notable because while I am forced to gather for my lovely three-tiered skirts, I really hate it a lot.  Pintrest now owns my soul, I believe, as it gave me a snazzy tutorial on making gathering easier.  It totally worked.  Check it out here.

Sunday, October 21, 2012

Faerie; Halloween 2012

Tonight I did the hair, make-up, and dress trials for my completed Faerie costume.


The dress is an old one that I made many years ago for an unremembered occasion, though its been decorated and redecorated a couple of times for different feasts and/or parties.  My hair is held back with a fancy metal hairband and fascinator, and some clipped in flowers with glittery edges to hold back my bangs.  My makeup isn't anything revolutionary, but I am trying false lashes for the first time.  A hilarious undertaking, really.

Anyway, as they say, "TA DA!"

Saturday, October 20, 2012

Faerie Wings; Fin(ish)!

With other projects that I am working on (and this crazy idea that I'm going to craft my way through Christmas presents) I needed to finish my wings tonight, but was a little stuck on how to harness them to my back.  Unfortunately, this wasn't something I could play with using my dress dummy, the faithful Genevieve, so I had to conscript my wonderful (and usually patient) sister, Rivi.  Ultimately, we found that a long (long, long) scarf wrapped and tied in crazy ways holds the wings securely, and masks the wooden block (that masks the joints of the wings).

Viola...


Tomorrow I am doing trials of the dress, the wings, and the make up all together.  I will endeavor to have pictures taken in order to share with the rest of you.  :-D

Faerie Wings; Again!

I had to take a bit of time away from my Faerie Wings in order to outfit a certain young Princeling who was dying to be "The Hulk" this Halloween.  I'm pretty proud of the result...


But, I got back to "winging it" (har de har har) tonight...

Un-pictured is the night that I spent with Dear, Old Dad engineering the boning and setting it, which is to say that Dear, Old Dad asked me what I wanted, and then whisked away my wings in order to make it happen.  In any case, this was the result.

The big *sha-bang* with these wings is that I plan to have them light up.  Pictured here is a floral stem with some LED lights on the ends and its accompanying battery pack.

I slid the floral stem in between the two layers of  fabric and proceeded to mold the stems into something looking like the vein-work you'd see on a butterfly's wing.

I chose a gold color of embroidery floss to stitch my "veins" into place, ensuring that they will stay molded as I've commanded.  The gold highlights the design nicely, but I think that if I ever do this again, I'll be molding the "veins" differently.

And here we are, all lit up!

Now, I just have to figure out how I am going to wear the darned things.


Wednesday, October 10, 2012

Peacock Ensemble

An idea that I've had kicking around in my brain pan for many, many moons was to make a dress based on a peacock.  There were many designs I had dreamed of, fell in love with, and for whatever reason, cast aside later on.  But, finally, the time came that there was a masquerade put on my LARPing schedule and I felt the time was right for the peacock dress to become reality.

I started with these fabrics...


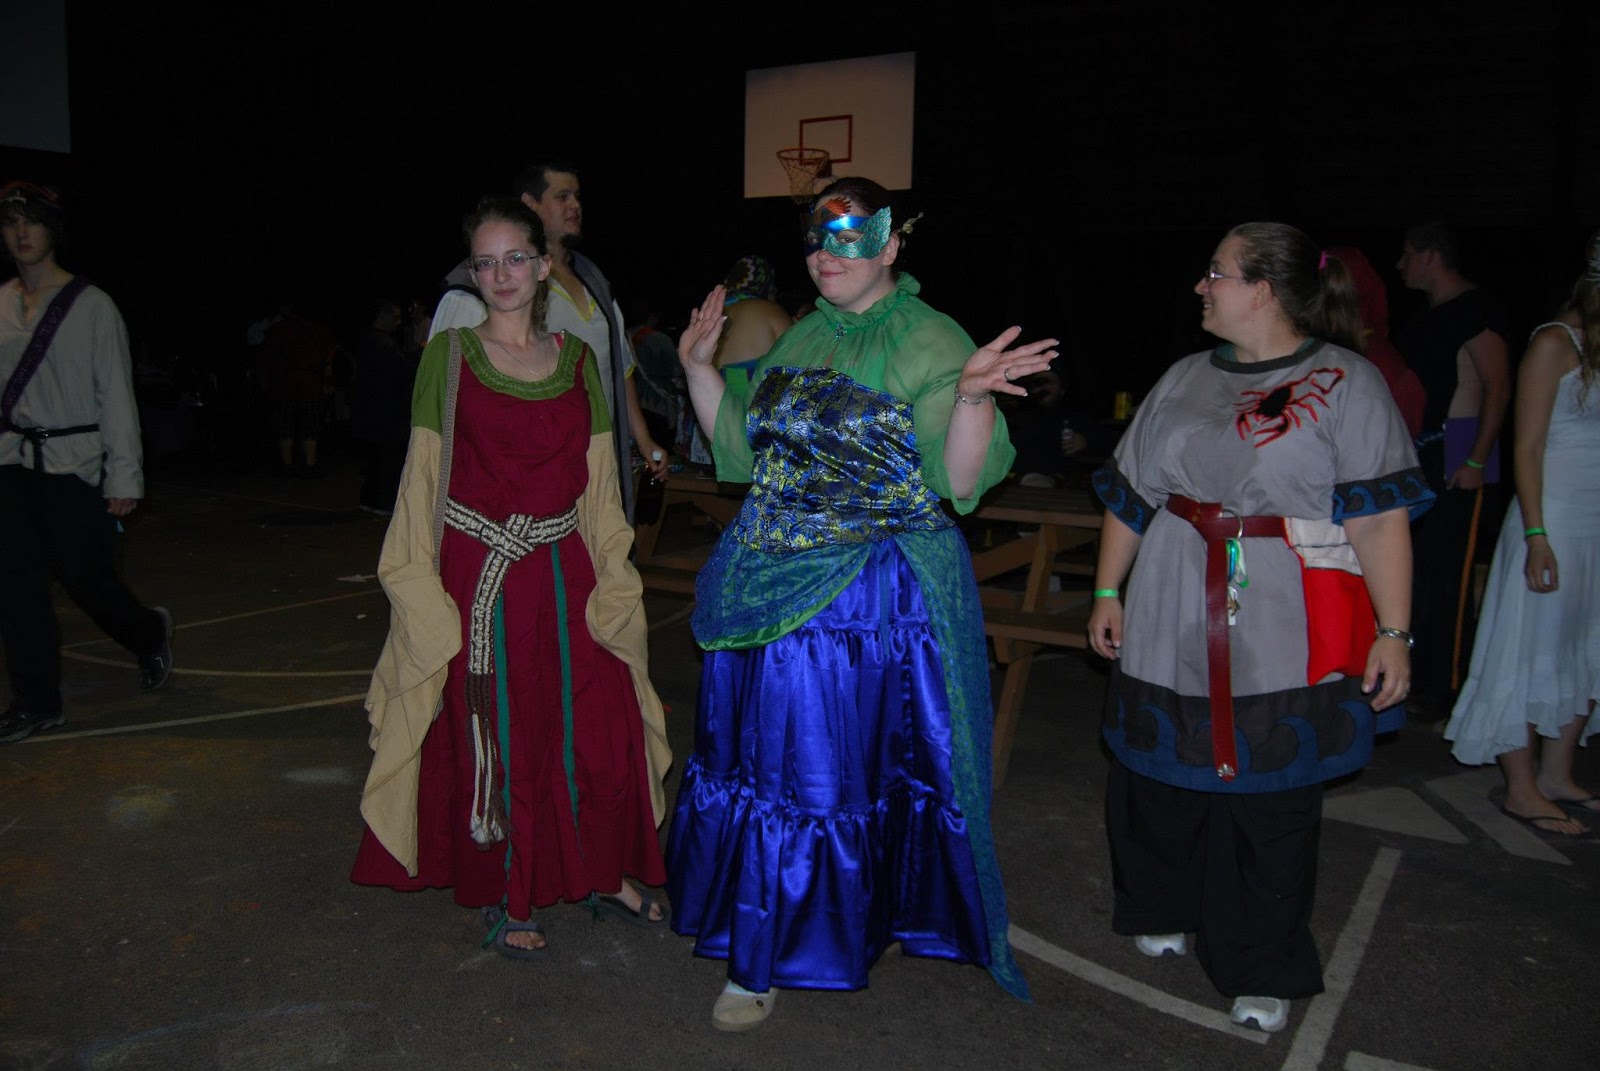
And turned them into this ensemble...


I added a bustle (of sorts) and all together, it looked like this...

Yes, that is "Autumn Queen" next to me in her dress, sans the skirt.  My *beautiful* mask was made by Contessa Esselia, who is an amazing artisan.  My ensemble paled in comparison, enlarge the picture and you'll see that it is a bit on the "ill-fitting" side.

I don't think I've mentioned it here yet, but 2013 is my year to "Fix It and Finish It".  With it fresh on my mind, the Peacock Ensemble gave me an opportunity to get a jump start.

I started with the skirt, which had some problems.  I adore three-tiered skirts, but I hate (read: HATE) gathering.  When you hate gathering, but love three-tiered skirts, things like this happen...

Enlarge the picture, and just about dead-center, you'll see it.  Yup!  A little tuck of gather escaped my initial seam!

But I overcame this dilemma by adding some trim.  I realize that I'm admitting to all kinds of mistakes here, something that artisans should never do, but I see no point in trying to be sly...

I just sewed some trim right over the seam.  It covered and sealed the tuck away just fine!

And I feel that the skirt looked better for the trim, anyway...

Far-away and close-up views of the trim on the skirt.

The bodice had *many* problems...


I am not really sure what I was thinking, but when I put this all together, I didn't bone the bodice *at all*.  Not even lightly.  I also thought I was clever by putting a zipper in the back, the initial thought being that I could put it on myself and not have it take 1/2 an hour; good idea, terrible practice.  Finally, I managed to forget a common problem that I have with bodices of any kind, which is that my "overbust" measurement is smallish in comparison to the rest of me.  Overall, I had an ill-fitting, rumpled mess that wasn't *awful*, I suppose, but I didn't feel *amazing* in it.

So I boned the bodice, took out the zipper, and hacked out about an inch from the back...


I won't go into a lengthy description of what I did here, but some highlights include: I use industrial-size cable ties as cheap and easily attainable "medium" boning and I make sure I *number* the darn things as I measure them for length against the bodice so I put them in the right way.

I hit my sewing-zone as I button-holed and boned the bodice, so I sadly don't have any progress pictures to show, but here was the end result...

I managed to restore my faith in my own sewing ability, just by boning a bodice!  Duh!

This ensemble will undergo a few other changes, mostly having to do with the bustle (and turning it into an actual bustle) and a hat, in time for New Years.  So, be sure to check back.


Monday, October 8, 2012

We Interrupt Your Regularly Scheduled Program

I've been faced with a technical difficulty in the construction of my Faerie Wings.  Without giving too many spoilers, suffice to say that I need to learn how to solder and that my chosen instructor for this task (dear, old Dad) is out of town for the next couple of days.  This creates a bit of a stand still.

But I cannot remain idle, so I will interrupt your regularly scheduled program with a stuffed animal project of mine!

When I got into making stuffed animals, I didn't really have much of an appreciation for how their patterns are drafted.  I figured that since I modify garment patterns all the time, a stuffed animal's pattern shouldn't be that far off.  I couldn't have been more far off from the truth on that count, but as we go, we learn.

But, when I was still naive to this point, a friend of mine asked me to make her a barn owl that was decorated with some gears and of medium cuddleability.  I figured that I could simply modify the face and wings of a penguin pattern I had already tried and it would be fine.  It wasn't quite the case.

This is the penguin that I had previously made.  It was a Valentine's Day gift for my son.

This was attempt #1 of the Barn Owl.  You can see how it still reads as very "penguin".  The head wasn't really tall enough, the facial disk (which is so particular to barn owls) was shaped a little wrong, and the beak is very "off".  I sent pictures of this critter to my friend, promising that if she didn't like it I would give it another go.

So, here is attempt #2 and I am very glad that I gave it another shot.  I elongated the head, smoothed out the heart-shape of the facial disk and redesigned the beak entirely.  My friend has already seen the un-decorated version of attempt #2, but here is the finished critter from the front.

The right side.

The back side.

The left side.

An up-close shot of the face.

Tomorrow I think I'll be tackling some mending that has been haunting me.  It is a piece that I haven't posted here, though, so it should be exciting all the same.


Thursday, October 4, 2012

Faerie Wings; Night Three

I had a minor set back last night in that the weather where I am was bad, and my joints became all kinds of creaky and achy.  It also gave me a headache, which just put me in *no* mood for sewing.  The headache persisted into today, though the aches had gone away, so it looked like another "wash" night, but with the help of some over-the-counter migraine meds, I got back up on my feet.

As you go through, please bear in mind that both wings are individually made up of two layers of fabric.


I started by sewing a small seam at the wing joint, just to finish it off.


Then, I sewed my fabric together, right sides touching.

All sewn up... with "helper" MG lurking by.

A close up of the seams.  Please note that I back-stitched at all corners and points.  I would have done this with a cotton, but since I'm working with a sheer, I *definitely* did it.

Clipping corners is important!  Making stuffed animals taught me this, so now I am very careful to snip off my corners, and then trim off a bit of the angles.

Sewn together, corners clipped, turned, and top-stitched.

Pinned and held up to my dress-form for size reference.  A fan was blowing on the wing, hence the distortion.

I need to make channels for the "bones" of my wings to slide through.  I use bias tape for this kind of thing.  Whether I cheat and I buy it, or I have the scrap/time/patience to make my own, bias tape is a multi-functional, wonderful thing.

I sewed very closely to the top edge and the bottom edge of the wing.

A close up of the bottom edge, with the bias tape channel.

Yes, I did use an "off" color for my construction.  This was purposeful and meant to add a small bit of variety to the coloration I'm working with.  Besides, the wings glitter.  I'm not sure that many will notice.

Tomorrow I'm going to put the bones in my wings and perhaps learn a new skill as I do so!


Tuesday, October 2, 2012

Faerie Wings; Night Two

And here we are at night two of our grand adventure!  Last night I had thought to be ambitious tonight and to both cut and sew my wings together, but my son (herein referred to as "Princeling") had other ideas that included watching YouTube videos such as this one.  So, I only got around to cutting my wings out.

Naturally, I had to cut my pattern out of the tissue paper that I drew all over last night.

This is my fabric for this project.  It is a sheer brown with glitter-bits dotted all through it, as I'm working towards something along the lines of an autumn faerie.  MG, my faithful cat, is shown helping me here as cats often do.

I cut four pieces of cloth into the shape of my pattern.  At this point, you are probably looking at the picture above this one and wondering what I plan to do with *the rest* of the fabric I bought.  I have no idea.  I *way* over-bought.  I'm sure I'll think of something fancy.

And here we are, all cut out.  In my infinite wisdom, I forgot to cut my pattern with seam allowances, so I had to eyeball the seam allowance as I cut.

Tomorrow night shall be the sewing!